The store locator module provides all the standard features available with Google maps:
- Zoom In and Out
- Street View
- Driving Directions
- Etc.
Figure 1 - Configured retailers appear on a Google Map, embedded within the module.
Figure 2 - >Google Driving Directions to a retailer can be accessed directly through the module
Figure 3 - Google Street View of a retailer can be accessed directly through the module
Mobile View
In mobile view the store list and map view flips into a tab view for easy view on your phone.
Stores are physical locations that are selling and distributing goods to your customers. The Store Locator module allows you to manage all your retail locations.
To manage your retail locations, navigate to the page you have the store locator module added to and hover over the pencil in the upper right corner of the module.
After you click "Manage Stores" you will see the following page displayed. To add a store, click the "Add Store" button.
To edit a store click the pencil next to the store you want to edit.
The following editor will be displayed:
Store Type – Select from Standard, Elite or Premier to customize the map markers that will appear on the front end of your Store Locator module.
ID Number – Assign a custom ID number to each individual retailer.
Products - Check the Boxes for the Products that you want to associate with this store.
When you are finished entering your data, click the "Save" button.
Manage Products
Enter products that your customers can find in one or more retail shops. Each store can have unique products configured. When you have Products configured, users can select check boxes for the products they are searching for. The map of stores will then be automatically filtered by the products your customers selected.
To manage products, navigate to the page you have the store locator module added to and hover over the pencil in the upper right corner of the module.

After you click "Manage Products" you will see the following page displayed. Click the Add Product button to get started.
You will see the following screen:
Sort Order - The sort order field controls the order in which the products are displayed in the listing.
Product Name - Enter your product name in this field. The product name is displayed to the user in the product checklist.
Product Sku - Enter your product sku or model number in this field. The product sku is typically a unique number that identifies your product for inventory purposes.
Price - The price is the cost you want to charge for your product.
Price Unit - The cost or price of an item based on the unit of measure.
Quantity on Hand - The quantity on hand field is used to manage your available inventory for your product. Enter the current available product quantity you have available in your inventory.
To edit a product, click on the pencil icon from the manage products screen.
Your products are now ready to be configured for your stores.
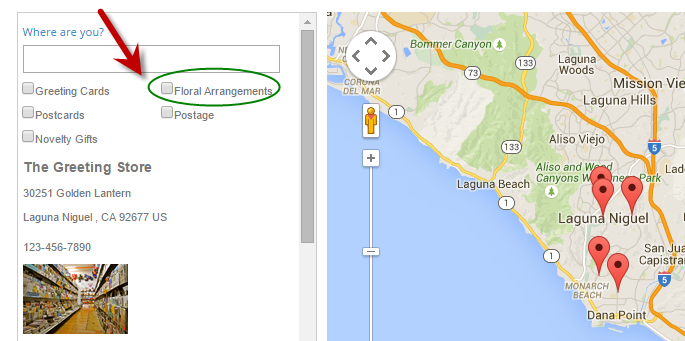
Filtering by Products
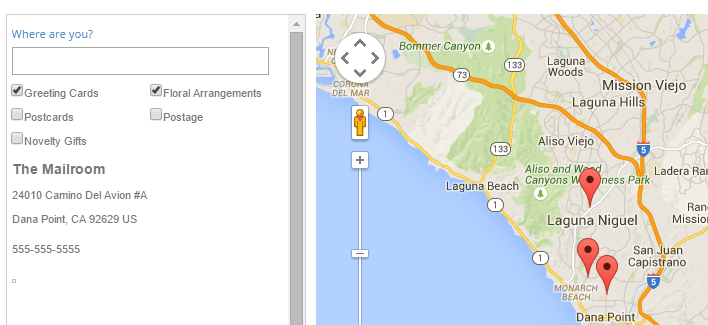
If you have configured Products and Retailers, you can now filter the locations shown on the map. To do this, select the checkbox(es) for the product or products you are searching for. Below, all listed locations are showing on the map:
The map will then return results for the stores carrying the product or products you have selected. Now, only locations carrying floral arrangements or greeting cards are displaying on the map:
Settings
After you have added all your store locations, the next step is to configure the module settings. Navigate to the page you added the Store Locator module and hover over the gear icon in the upper right corner of the module and click "Settings":
After you click "Settings" the following settings page will be displayed:
API Key - Enter your Google Maps API Key. Please login to https://console.developers.google.com select your project and then navigate to API Library, then use the search to find the API service name and enable it, I recommend enabling these 4 libraries:
- Maps JavaScript API
- Geocoding API
- Places API
- Directions API
For more information on requesting your Google Maps API Key, please click
here.
Latitude – Set a default starting latitude for your Store Locator map, used if your customer chooses not to share their location, or if you do not opt to use the geolocation feature.
Longitude – Set a default starting longitude for your Store Locator map, used if your customer chooses not to share their location, or if you do not opt to use the geolocation feature.
Zoom Level – Set a default zoom level of the Google map.
For example, to display the entire United States centered, enter the following:
- lat: 39.828300
- long: -98.579726
- Zoom: 4
Use Geolocation – Check this box to enable Geolocation. Geolocation is used to automatically detect the geographic location of the user from their web browser.
Importing Data
To import your data to Store Locator follow these steps:
- Export your data from your data source (your old Store Locator) to either xls or csv.
- In SQL Server Management Studio connect to your DNN database and follow the instructions in the following article to import to Store Locator http://www.mssqltips.com/sqlservertutorial/203/simple-way-to-import-data-into-sql-server/
- The Store Locator table that you want to import to is called "Smith_Retailer"
Extensions/Customizations
The Store Locator module can be extended to fit your business requirements. If you’re interested in receiving a quote for customizations please request a quote using the following link: