Custom Viewsets are applied to the Portal/Site level and will affect all the stores you have created for this Portal!
Viewset Visual Studio Project w/IntelliSense
Extract it inside: /Portals/{ID}/RazorCart/
The project includes all references for the view files but not the files themselves, when you “Copy Viewset” from Admin-Console then the files can be opened/edited in Visual Studio with Razor IntelliSense.
IntelliSense is a powerful feature that can dramatically increase your productivity. It is designed to make the development of your application much easier by helping you automatically generate code and access the RazorCart model properties in the Code Editor.
Access Model Properties from Browser Dev Tools
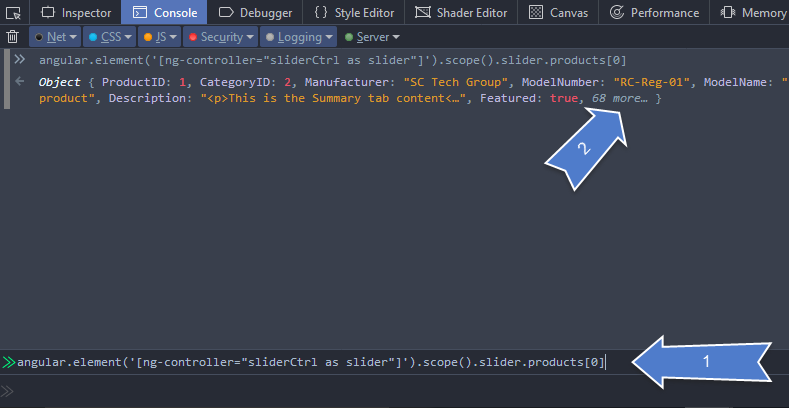
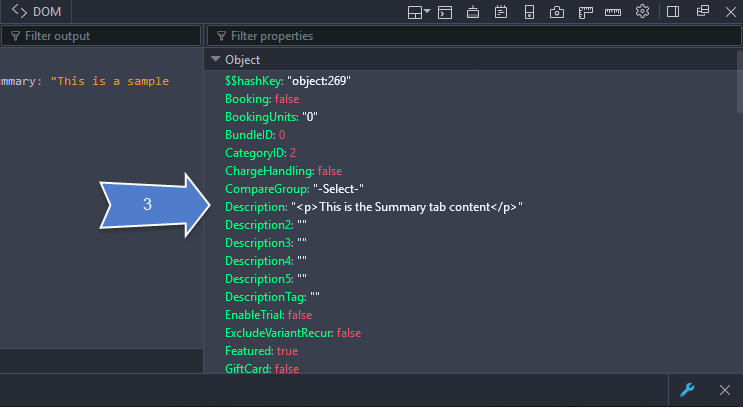
Another way to access the model properties is using your browser dev tools. Using your browsers JS Console (Developer Tools) you can get all the properties, for example:
Product List Module
angular.element('[ng-controller="listCtrl as list"]').scope().list
Product Details Module
angular.element('[ng-controller="detailsCtrl as details"]').scope().details
Product Slider Module
angular.element('[ng-controller="sliderCtrl as slider"]').scope().slider
Checkout/Cart Module
angular.element('[ng-controller="checkoutCtrl as checkout"]').scope().checkout
Mini Cart Module
angular.element('[ng-controller="minicartCtrl as minicart"]').scope().minicart
Category Menu Module
angular.element('[ng-controller="categoryCtrl as catMenu"]').scope().category
Quick Order Module
angular.element('[ng-controller="entryCtrl as entry"]').scope().entry
Product Grid Module
angular.element('[ng-controller="gridCtrl as grid"]').scope().grid
My Account Module
angular.element('[ng-controller="accountCtrl as account"]').scope().account
The following screen shots are of the browser developer tools and show how to view the properties of the product slider module:
Once you have the module properties you can add your own custom logic using c# or js.
In regards to the model properties, the double curly braces are AngularJS Expressions <https://docs.angularjs.org/guide/expression> which are transferred from the MVC.Net model to the Client's AngularJS model.
Customizing RazorCart Admin Pages
The following example illustrates how to customize the order admin screen:
- Create a folder "AdminConsole" in "/Portals/{ID}/RazorCart/Viewsets/"
- Copy the file "_ViewStart.cshtml" from "/DesktopModules/RazorCart/AdminConsole/Views" to the above location. Don't modify it unless if you also want to change the layout location to edit it!
- Create another folder "Order" and copy the file "Edit.cshtml" from "/DesktopModules/RazorCart/AdminConsole/Views/Order" into it.
- Edit the view file "Edit.cshtml" as needed. Add the html label and use @model.Order.UDF1 to populate that field.
- Recycle AppPool or you can click "Restart Application" from server icon in Admin-Console if you're logged in as a super user. This is needed to update the MVC view locations.
** Only the copied view files will be loaded from Portals folder, the rest will be loaded from the DesktopModules by default, also viewset files inside the Portals folder will not be lost during installation/upgrading.
Resx Files
All front end user facing modules use Resx files to store labels so that they can be changed and localized for different languages. The following is the path to all the resx files in RazorCart:
\DesktopModules\MVC\RazorCart\[ModuleName]\App_LocalResources