Select the Products tab under Inventory on the left hand side.
From the "Manage Products" page click the "Add" button to add a new product.
Enter a title, description and other required information for your product. Click the save button to save the product.
Next, click the "Bookings" tab, check "Enable Bookings" and the following page will be displayed.
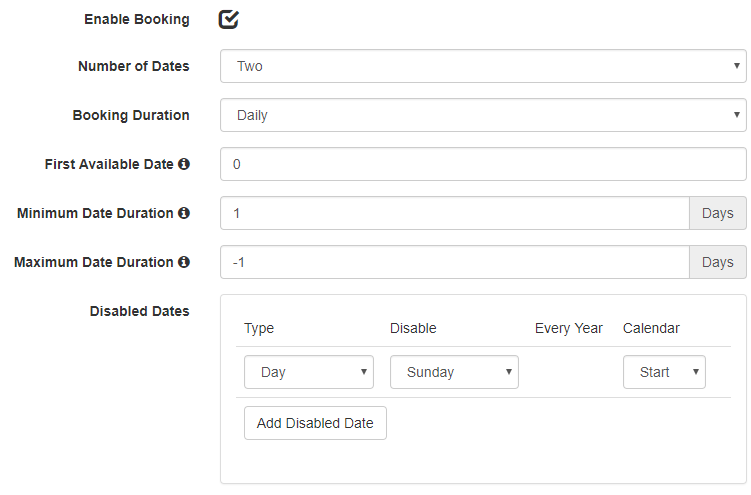 Number of Dates - Select the number of date pickers you would like to use, for booking rooms, use two. Most appointment bookings only require one date picker.
Booking Duration - Set the unit of time you would like your booking to be measured in. Daily is good for rooms, but appointments might be hourly or even half-hourly.
First Available Date - By default, your booking products are set to become available immediately. If you have renovations or haven't opened yet, set this field for when you'd like guests to be able to check in.
Minimum Date Duration - Select one or more if you don't want users to select the same start and end date/time.
Maximum Date Duration - Select the maximum number of day/time units a guest is allowed to reserve. For example, some camp grounds only allow guests to stay for 7 consecutive nights, so they would enter 7.
Disabled Dates/Times - Use these options to select days you don't want to accept any bookings. If there are none, leave it blank. This can also be used to block out time slots or time ranges, for example, if your office closes for lunch daily you can disallow guests booking appointments during this time.
Variants
Variants are useful if you need to collect information from guests, such as how many adults/children will be staying per room or what kind of services they would like to reserve. Navigate to the Variants tab from the product setup screen.
First, you will need to add a Variant group, think of this as the category for the options. You may have more than one variant group on each booking product.
After you have added variant groups, you can add your variants.
When adding a variant, you will need to select which group first, then give it a name and SKU if applicable. You can also add images if applicable.
Select the display option for your variants. In this example, I will be using a dropdown list.
Select the pricing information for your variants. If there is an upcharge for a selection, such as a pet fee, you can enter it here.
Save and repeat until you have finished configuring your variants. Your guests will then be able to select from your variant options from the product booking screen.
You now have all of the tools you need to configure and manage hotel booking products in your store! If you have any questions or want to discuss customizations, please Contact Us.