RazorCart is fast and easy to setup. Follow the steps below to get your store up and running.
Select the Store tab under Store setup on the left hand side.
Store Name (Required) - The name or title of your store or your website
Store Address (Required) - Enter the address for your store location or office location.
Store Country (Required) - Select the country that you operate your business from. The country dropdowns in the cart checkout will default to the country you choose here.
Store State/Region (Required) - Select the state/region that you operate your business from. Depending on which tax option you select in the tax setup section only customers in your home state/region and country will be charged tax.
Store Postal Code (Required) - Enter the postal code where you will be shipping product from. This is used in calculating shipping rates in the cart and is a required field.
Store Currency (Required) - Select the currency symbol that you want to display in the cart. The cart is programmed to dynamically generate the currency symbol using the dot net built in localization functions and will support any currency in the world.
Email Setup
Click to open the Email setup tab and enter the settings for your store emails.
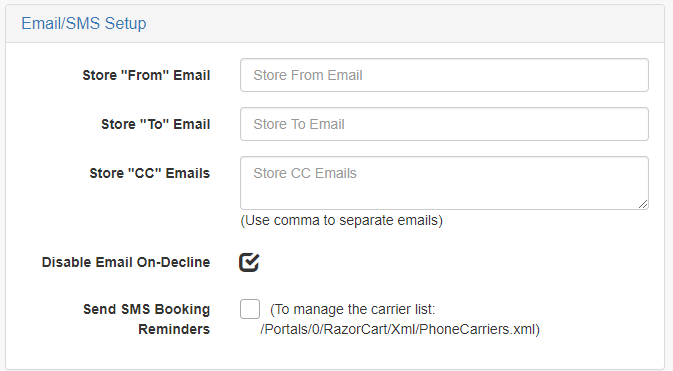
Store “From” Email Address - Enter the email address that you want the order email notifications to the customer be sent from.
Store “To” Email Address - Enter the email address of your store administrator you want to receive order email notifications.
Disable Email On Decline - By default an order confirmation email is sent on successful or declined order. If you check this box only successful orders will receive an order confirmation email
Send SMS Booking Reminders - Use this setting to send text message reminders for booking products. To manage the cell phone provider/carrier list, visit /Portals/#/RazorCart/XML/PhoneCarriers.xml. When checked the following options are displayed that allow you to configure when the SMS reminder is sent. The SMS reminder can be configured to be sent any number of hours or days before the booking.

Cart and Checkout
Click to open the Cart and Checkout panel so you can fill out the settings. The cart and checkout settings will be reflected to your customer during their checkout process.
Show Company Name - When show company name is checked, a textbox will be displayed on the cart page of the checkout titled company name. It is useful to customize your checkout in a B to B scenario.
Show Manufacturer - When checked displays the manufacturer name next to the product in the cart.
Show Opt In Checkbox - When checked display an opt in checkbox on the cart page below the customer/shipping section.
Show Accept Terms Checkbox - When checked, display a required Agree to Terms and Conditions checkbox during checkout.
Show Custom Field 1 - Displays a fillable text box on the cart page. You can make this a required or optional field. Path to change the label for Custom Field 1: \DesktopModules\MVC\RazorCart\Checkout\App_LocalResources\Checkout.resx
Show Custom Field 2 - Displays a fillable text box on the cart page. You can make this a required or optional field. Path to change the label Custom Field 2: \DesktopModules\MVC\RazorCart\Checkout\App_LocalResources\Checkout.resx
Hide Price - When hide price is checked the “Price” field is hidden on the cart and checkout pages.
Hide Subtotal - Check this box if you would like to hide the sub total lines (Subtotal, Shipping, Tax, Discount and Total) on the following pages and emails:
- Cart
- Confirmation Page (Before Payment)
- Confirmation Page (After Payment)
- Customer and Admin confirmation emails
This feature is useful if your site is “Request a Quote” only or if your business only sells to resellers that require prior approval before buying your products.
Enable Donation at Checkout - Select the product you would like users to be able to donate during checkout. The product you select here will be offered as a donation when users are purchasing other products.
Show Special Instructions - Select an option to display a multiline special instructions textbox to the user. Special instructions are displayed to the user during checkout either on the Step 1 page or the confirmation page. The special instructions entered by the user are saved in the cart database and also emailed to the user and the store admin.
User Entered Amounts - Check this box if you want the user to be able to enter a price for your product or service. This is a global setting that will make all products user entered amount. If you want this per product then check this checkbox in the product setup page. This option is typically used for online bill payment or sites that collect online donations.
Minimum Order Amount - When the store admin configures the minimum order amount the following will happen on the cart page:
- The minimum order amount rule will be checked against the cart subtotal amount.
- If the carts subtotal amount is less than the minimum order amount configured and the user clicks the "Proceed to Checkout" button the cart will display the message "Minimum Order Amount Not Met" and will not allow the user to move past the cart page and checkout until the minimum order amount is met.
- The "Minimum Order Amount Not Met" message is configurable in the cart resx file to any message you like.
Limit Products in Cart - Use this setting if you want to limit the number of products a user is allowed to have in their shopping cart.
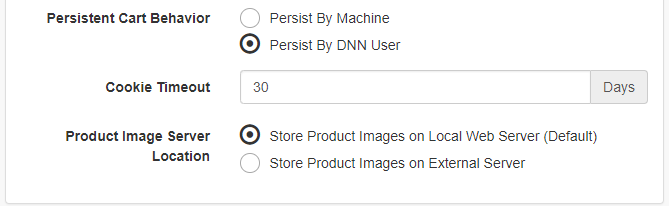
Persistent Cart Behavior - Controls how user carts are persisted and how abandoned carts are retrieved across user sessions.
Persist Cart By Machine (Recommended) - This option will persist and automatically retrieve the user's cart by machine using cookies.
Persist Cart By DNN User - This option will persist and automatically retrieve the user's cart by DNN UserID using cookies. If a user is not currently logged in then the users cart will not be persisted across user sessions and abandoned carts will not be automatically be retrieved. This option should be selected if users are sharing the same computer.
Cookie Timeout (Days) - The cookie timeout value allows you to configure the number of days before the cookies expire and the user’s cart is automatically retrieved. Enter zero if you don’t want a persistent cart. This may be useful in a scenario where users regularly share computers. Enter 365 for the cookie to expire after a year. When a user successfully checks out and purchases the content of the persistent cart will no longer be retrieved. If you don’t enter a cookie timeout value the cart defaults to 60 days.
Store Product Images on Local Web Server - This is the default setting and when selected your product images will be stored in a relative path of your local DNN installation (\Portals\[PortalID]\RazorCart\).
Store Product Images on External Server - Product URL – The Product URL option will use the full path specified in the image fields in the "RZC_ProductImages" table to retrieve product images. In RZC_ProductImages table, image field enter the full URL in the following format: http://www.mediaserver.com/storeimages/blueshirt.jpg
Inventory and Stock
Enable Inventory Management - By default, inventory management is disabled, meaning the cart will not decrement the quantity on hand for each product that is purchased. If you want to enable inventory management, check the box. When checked you will see the following options:
No Backorders - This option will display a sold out message and prevent the user from adding to cart.
Allow Qty Below 0 - This option will allow the user to add to cart/checkout and will decrement the qty on hand.
Allow Qty Below 0 and Notify Customer - This option will allow the user to add to cart/checkout, will decrement the qty on hand, and display a message to the user on the product details.
User Management
The user management settings allow you to configure specific features related to your store and DNN user and role management.
Disable User Profile Sync - By default RazorCart updates the dnn profile when a user checks or or when a user updates their information in the My Accounts module. If you do not want the dnn user profile to be updated then check this box.
Show Price/Cost by Roles - Select the user roles that you want to display product pricing for. If this field is left blank, then price will be displayed to all users.
Show InStock Quantity by Roles - Select the user roles that you want to display the Quantity on Hand to. If this field is left blank, then Quantity on Hand will be displayed to all users.
Show Add to Cart by Roles - Select the user roles that you want to display the "Add to Cart" button to. If this field is left blank, then the add to cart button will be displayed to all users.
User Profile Property Map - Select a DNN User Profile Property to be displayed during checkout and included in email confirmations.
Wishlist and Save Cart
Click to open the Wishlist and Save Cart tab.
Enable Wish List/Saved Cart – Check this box to allow users to create wishlists and saved carts. Once complete, save your settings.